As part of my work experiments, this week I would like to write down the things that one needs to know in confluence that can up-skill their documentation works. I will cover the following 5 things,
- How to Anchor link a title?
- How to Anchor link to a section?
- How to create a dashing dashboard?
- Panel - Confluence Macro
- Layouts - Confluence Tools
- Content by Label - Confluence Macro
1. How to Anchor link a title?
This is the most required thing. Most useful when one has to refer to a section internally on the same confluence page.
Let's consider you have a page with three different sections and titles as shown below,
In this, if you want to add an internal anchor from a text in paragraph 3 to a title in paragraph 1, you can add it as follows,
- Choose the word that needs Anchor
- Click on the link icon from the Toolbar above
- In the link box, enter #Page Title 1
- Click Insert
2. How to Anchor link to a section?
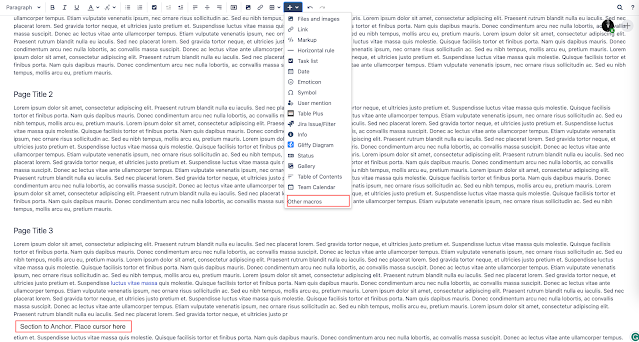
To do this, you need to add an anchor from the Macro as follows,
- Place your cursor to where the link should navigate to
- Click on the "+" menu in the toolbar > Choose Other macros
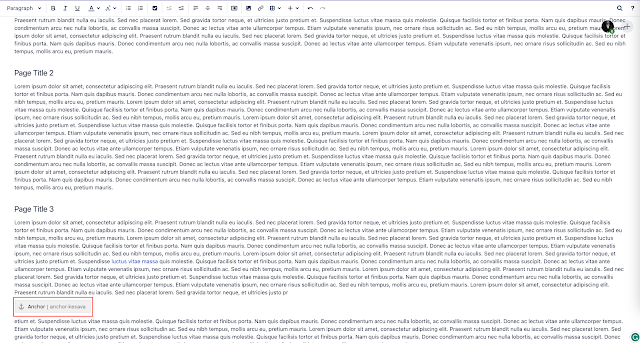
- In the appearing popup, search for "anchor" and choose it in the appearing result
- Now, on the appearing screen, type an anchor name and click Insert
To create a dashing dashboard on confluence, all that we need is a couple of built-in macros as follows,
- Panel
- Layouts
- Content by Label
With the help of the three of the macros above, we will build a cool dashboard down this article. Before we start, let us consider the following content on our page,
3.1 Panel - Confluence Macro
First, let us look at creating a Panel in a confluence page. This panel will help you categorize anything on your dashboard page. To add a panel, follow the steps below,
- Select the text you need to put inside a panel
- Click on the plus available on the toolbar above and choose "Other macros" as indicated below,
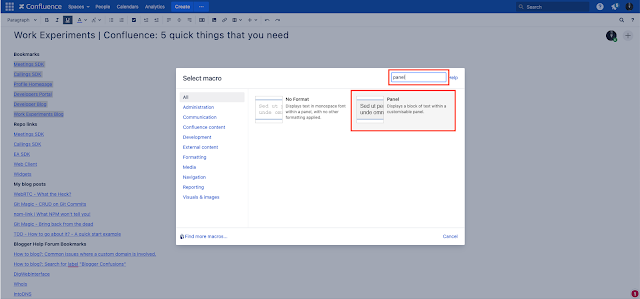
- In the appearing window, search for Panel and choose the indicated one in the following screenshot
- For the panel configuration, I will fill some of them and preview as indicated in the below screenshot,
- When this is done, we can remove the Bookmarks title from the page as it comes with the panel itself and preview the page as shown in the below screenshots,
- To get contrasting colours of the same shade, you can use any online colour palette. I use: https://www.color-hex.com/color-palettes/
- We will first add all four of the sections with similar panels following the above steps:
There we go. We've successfully setup the panels for our unorganised links.
3.2 Layouts - Confluence Tools
Although we have the panels in place to separate each section, there is a lot of free-space that can be made use of. Therefore, we shall try to use confluence layouts to organize them.
- Edit the dashboard and click on Layouts icon from the Toolbar
- A default layout is setup for the whole page and a sub-toolbar appears
- Now, click on + Add Section and then ꜛ Move up
- The newly appearing section can be split using the split sub-tools. I will split into 3 equal sections
- Once done, we shall drag and drop the 3 panels into each of these split sections as shown below,
At this point, I would like to extend my thanks to Adam Ranganathan, from whose dashboards this dashboard was inspired.
3.3 Content by Label - Confluence Macro
We already have a neat dashboard of links. We shall now try to use this macro to automatically pull in links to other confluence pages based on their labels.
- We will first split the Second Layout into two using the Layout Sub-tool
- Once done, create an empty panel as shown below,
- Now that we have created a panel, let us add a Content by Label Macro inside
- To do so, click inside the panel and add the following Macro,
- Let us suppose you have classified some of the confluences as meetings-wiki by adding labels. You also have additional label called meetings-wiki-review for the documents under review. Now, in your dashboard, you need handy links for all the confluences under meetings-wiki that are not under review. To get that done, we shall do the following,
- In the above screenshot, to include the wikis, I've added the label: meetings-wiki
- Similarly, to exclude the wikis under review, I've added the label with a negate: -meetigns-wiki-review
- One can also choose to Add other filters and also customise how it should look. I prefer the default settings for them.
- Once inserted, this is how it appears in the page,


Comments
Post a Comment